I started my encaustic endeavor with six 6×6 inch test pieces, looking to see what worked and what didn’t. It was pretty clear there was a lot more “what didn’t work” learnings.
 I remember in college taking a computer engineering digital electronics class, working with diodes, resistors, and transistors. One project had us build a circuit to demonstrate that 2 + 2 = 4, or somesuch goal. My friend Ronald Peterson put his together, flipped the switch, and it worked flawlessly. Mine did not. Nor did it work with the second attempt. But my takeaway was that if I didn’t make mistakes, I could not learn from them.
I am still a card carrying Project Management Institute certified Project Management Professional (at least until they want my renewal dues). So in the spirit of properly documenting each project’s Lessons Learned, here we go:
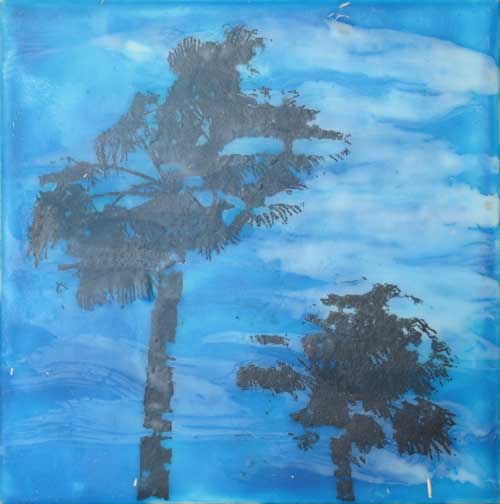
Palm trees image transfer #1

There are dozens of videos on YouTube on how to do an image transfer onto encuastic, and Jon Peters does a good video on this. But they all seemed to be premised on burnishing and more burnishing, then wetting the paper and daintily rubbing with your finger until the paper dissolved.
And be happy with the imperfect results.
Evident on the left palm is that chunks of the trunk didn’t transfer. On the right palm what happened is that entire sections of the tree started floating away as I was fusing with my hot air gun. Maybe I should have burnished for twice as long? Been more dainty with the rubbing?
At least the background sky looked credible.
Palm trees image transfer #2
 Same song, second verse. This time I was especially careful to burnish twice as long, and was especially delicate with the paper rubbing.
I didn’t even finish – I knew it was just not happening. The right palm especially the trunk got lopped off, and its left palm frond is a mess. The white haze on the palms is the paper I didn’t finish rubbing off or fusing.
There had to be a better way to do image transfers that were consistent and some reasonable approach to perfection. This method wasn’t it.
Still I was gaining experience with fusing techniques with my 20-year-old paint stripper hot air gun. My background was smooth as a baby’s butt and had no bubbles.
Test piece #3
 Andy Braitman of Cheap Joe’s Art Stuff has a multi-part YouTube series on creating an encaustic lakefront scene. He builds layers upon layers of wax, and demonstrates manipulating and embedding techniques.
So this is just some experimentation with layering different colors Mainly just blue, green, and white since that was all the colors and brushes I had out.
I noticed my titanium white was crackling and becoming iceberg-like. Something interesting but not what I was wanting. Hmmm. What caused that to happen?
Embedding, encasing, and intarsia
 Andy Braitman also demonstrated adding powders and other materials into the art. I didn’t have any vermiculite but I did have some Miracle Grow plant food and soldering wire, so in they went.
I noticed the process of covering the soldering wire with wax really dulled down the sharpness of the silver. And now weeks later I see that the Miracle Grow is starting to deteriorate.
And the white iceberging effect was even more pronounced in this.
But the intarsia test at the bottome right is what was remarkable about this for me. Wow, that really worked, looked good, and had the precision factor I was after.
Finally a semi-decent image transfer
 My search for how to do successful image transfers was answered not by Googling “encaustic transfers”, but instead over on the woodworkers’ YouTube channels, namely Steve Ramsey whose 2-minute video was the key to success.
It wasn’t 100% perfection, but close enough to where a little touch up with a black sharpie could render it pretty darned good.
The music is from one of my old piano books, scanned into Macromedia Fireworks, scaled, and reversed. Underneath I had encased a piano keys graphic I pulled down from the web. Although I was happy with the transfer I wanted the piano keys edges to disappear. Would transparency film work better?
First koi test
 So I have a huge koi pond taking up most of the front yard. Koi will be working their way into my art for sure. I was really intrigued by a piece that Lynne Bowden has on her website.
The koi was scanned in and scaled from a bag of Mazuri koi food. That green on the left fin is from a lily pad that was semi covering it. Creating my own koi image to own is high on my list. But do I use graphic images or hope the encaustic will follow orders and render something nice.
The kanji koi symbols in the upper right are something I lifted from the internet years ago and used on the Lone Star Koi Club’s website which I maintain. This is actually a color image transfer using the Steve Ramsey technique. It came out OK but I plan to do my next koi piece with intarsia-fashioned kanji symbols.
That was the end of my six test blocks of plywood. On to phase two!