My husband Arnold makes leather harnesses and vests, and we have this male mannequin modelling his latest creations. I thought it would be fun to bring it to life, plus get more experience with using my green screen and Photoshop.
The result is a three piece progression, small and simple to large and complex. After completing the last one I held an unveiling ceremony which I recorded.
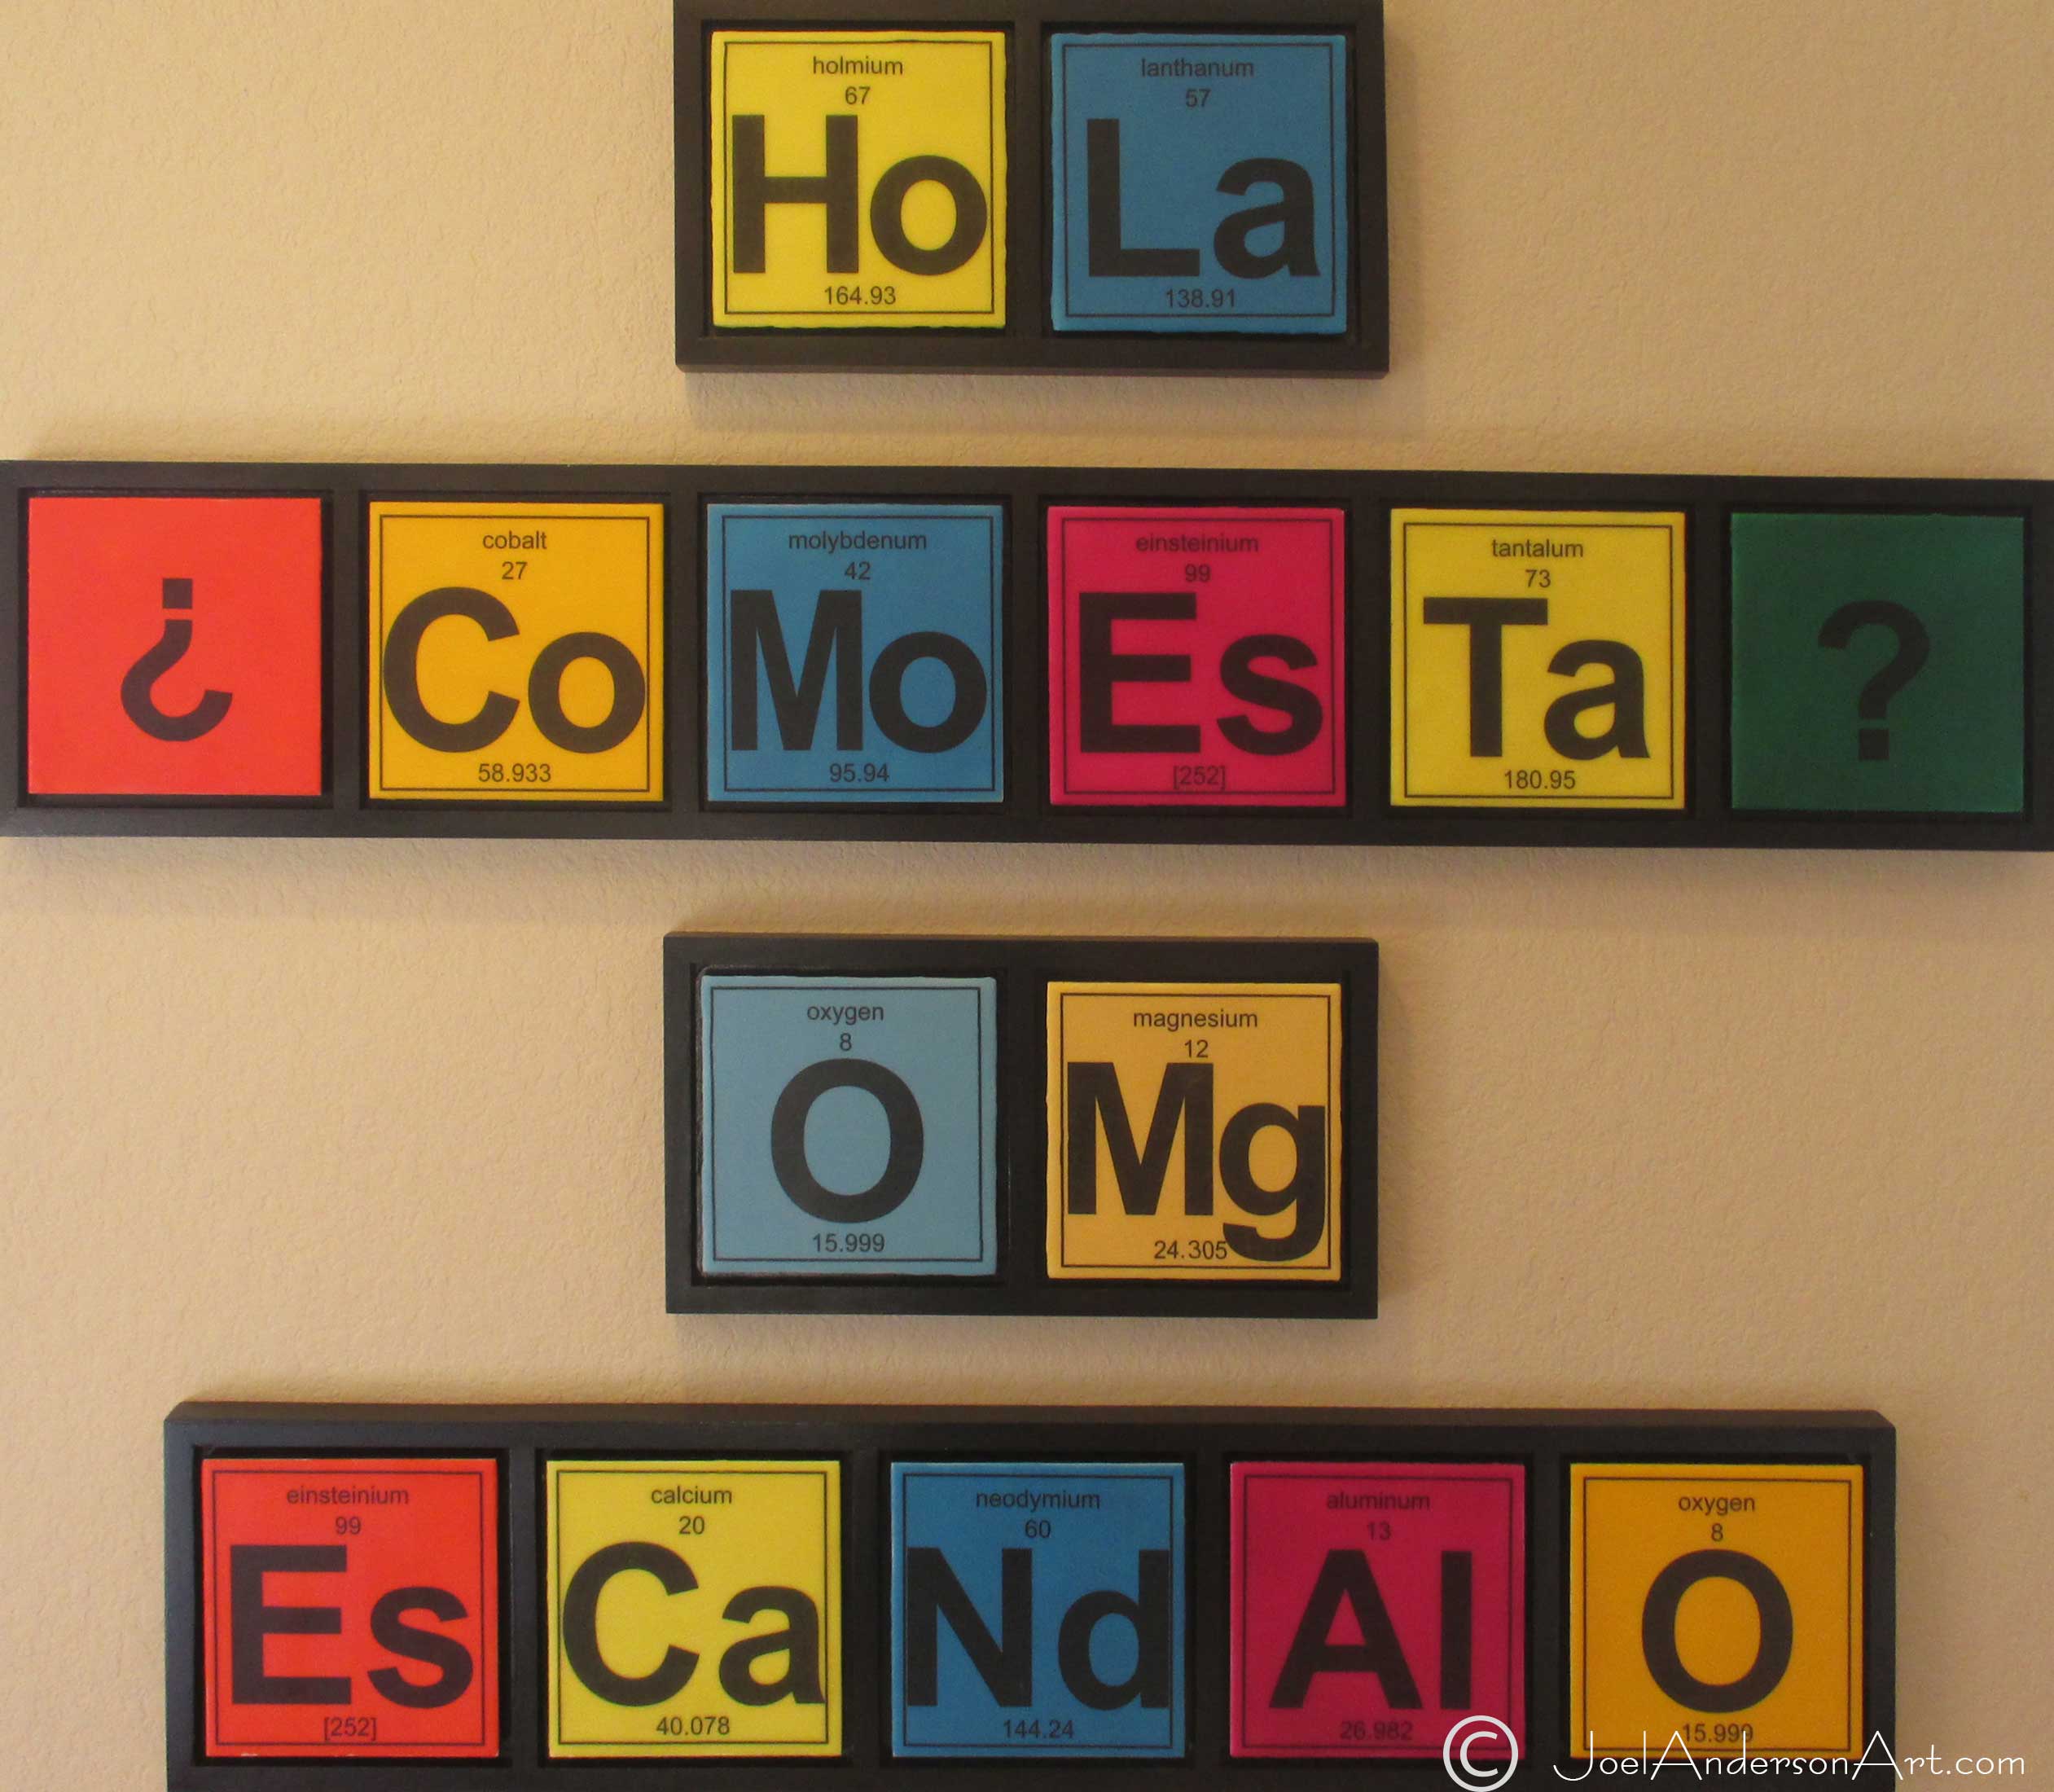
At the annual Bunnies On The Bayou shindig in Houston this year, I noticed a couple of guys (ok they were bears) wearing T Shirts that had ‘Be’ and ‘Ar’ from the periodic table.
It got me to wonder what other words or phrases could you put together. First I started looking at the periodic table and manually trying to put together cute words that came to my head. Then I tried a Google search, hoping someone had already come up with every last word and phrase. I found a couple, but none of the words were particularly stellar. (I might do a Canabis at some point.)
But then I thought of a few words in Spanish, and soon had some full phrases put together. Devising the framing to accompany these was also a nice diversion.
So here is the piece I call “Periodic Conversation in Spanglish”.
Before I got too far along I wanted to have some input on how I was doing. I took another of Salli Babbitt’s encaustic workshops and was horrified at her statement that one should not be putting resin topcoats on encaustic as it is a matter of adherence. Jeez – that’s what I had been doing with a number of my pieces!
So I had Salli over for a personal consultation. The main takeaways were:
My encaustic media was too soft. This sort of confirmed my anxiety about showing outdoors in September.
If I was going to frame my work, only use narrow, black frames. Or consider the method she uses of offsetting from the wall.
Start using a blowtorch.
Use Galkyd for a topcoat if and when I need to seal instead of the resin. She gave me a few artists who might be using resin topcoats to check with them.
Some works she liked, others not so much — as far as marketability.
Get some marble powder to mix in where I am doing intarsia in order to contain bleeding when fusing.
She suggested a few Daniel Smith colors to add to my pallet.
I’ve since done all of the above, except for the blowtorch which I will get before starting any new pieces.
Houston hosts an epic art festival every year in Memorial Park. I attended this year twice. The Friday visit was nice because it was quiet before the madness and I got to engage with a number of the artists.
A lot of the photographers were printing on aluminum. That is something I wanted to try, but my normal-sized inkjet printer a) is not big enough to handle anything wider that 8″, and b) it does not have a flat feed in for rigid objects.
I Googled to find a few demos of printing on aluminum foil. Two conditions were that you first needed to prep the aluminum with a solution that will grab the ink, and second you needed to tape your foil to a standard piece of paper in order for it to run through the printer.
This is a head-on shot of my 1964 MG Midget which, by the way is running wonderfully in this fine Houston weather we are having, thank you. I photoshopped out the background and changed the license plate tag to something a little more evocative of the need for speed.
It is glued down to an encaustic background and topped with a coat of resin.
Maestro if you please – 12″x9″ Mixed Media encaustic – SOLD
Last year a question on social media made the rounds: x number of things that nobody knows about you. I’ll have you know that I played violin in both the Fort Dodge and Iowa State University symphony orchestras! Ok, I was way, way in the back of the 2nd violin sections.
I had grown up taking piano lessons, and for some reason didn’t get involved with the school music departments until my later years of high school. The high school orchestra put me in the percussion section where an occasional piece let me play the xylophone. Otherwise I was playing all the ‘junk’ — the triangle, tambourine, cymbols, etc. Yvonne was the other member of the percussion section and she got the high profile tympani.
Anyway I was just fascinated by the violins and so soon started taking violin lessons.
Mr Huffman was the orchestra leader of the high school and local city symphony, and looked the part — sort of a Vincent Van Gogh.
So here is my nod to Mr Huffman conducting what must be in everyone’s repertoire, Beethoven’s Fifth.
The sheet music is a image transfer of a jpg I pulled down from an Internet site library of public domain sheet music. The conductor’s baton I got from Amazon, sanded down to lie flat, and embedded in resin.
The gas lamp in my front yard was the inspiration here. Here is the original photo which I photoshopped out the background. I then did an image transfer to encaustic background and added an intarsia flame. Topcoated with resin.
Mr Sun – 6×6″ mixed media encaustic
In the gardens we have a couple of these metal/glass prism stakes. I again ran my photo through photoshop to strip out the background, then did an image transfer – this time to an abstract color mix covered with layers of plain encaustic. I then etched out the layers of plain encaustic to reveal the base.
The center face I printed on inkjet paper and glued to aluminum foil, then encased in encaustic. A resin topcoat is added.
For relaxation I love to do the New York Times crosswords. I have a yearly subscription and use the Crosswords app on my android tablet. After/if I finish I read Rex Parker’s blog as he provides a daily (sometimes biting) critique. They get published at 9pm the day before publication date, so doing them before I head to bed puts me in a relaxed state.
Monday through about Thursday, that is. Monday is the easiest and they get progressively harder through the week. Saturday is beyond me, and I will sneak a peek at Rex’s column to see if he gives the Sunday (which is large) an ‘easy’ mark. Monday-Thursday almost always have a theme, or some trick to them that hopefully results in an ‘aha’ moment when the puzzle makes sense.
National PI day is March 14 (or 3.14.year). But it wasn’t until a week or two later that a PI-themed puzzle was published. Sometimes the Thursday puzzles are a rebus where one square can have multiple letters in it. It this year’s case (spoiler alert) some squares contained the letters “PI” and the answers were like the TV show “Magnum PI” crossed with the film “Life of PI”.
Anyway that gave me the inspiration to create the PI symbol with intarsia technique. For the PI digits a simple Google search found a website with PI calculated to the millionth digit. I was hesitant about attempting a photo transfer since my PI symbol was looking pretty good, so I opted to print the digits on office paper and encase in encaustic. A resit topcoat is added.
I’m going to be doing a larger version of this, maybe adding in some graphics with PI-related equations.
My earth-conscious friends would be appalled at the amount of paper towels this endeavor consumes. But I am re-purposing all the pine shelving that has been stored in the attic of the garage for 20 years — making my own frames stands for my pieces. In fact as I looked at my scrap wood from the frames I saw I could piece them together into a pinwheel. So I stained, glued, and put a polyurethane top coat on a set of four, then embedded in plain encaustic. This was my first mixed media 3-D piece.
Birthday bag – 6×6″ mixed media encaustic
Another encaustic artist I like with high Google visibility is Lisa Kairos. Inspired by her paper strip encasing I intercepted a birthday gift bag that was headed for the trash, sliced it up, and put it down on plain encaustic. It also went through the resin topcoat factor for a glass shine.
Etchings – 6×6″ encaustic & resin
In researching encaustics on the Internet, one thing you hear is that if you don’t like something, just pull it up or scrape it off and start over. This piece started off as the background for one of my guillochés but the color was off and ran badly over and under the image. So I ripped out the graphic, put down several coats of plain encaustic and etched out some random lines with a small screwdriver. The blocks at the bottom right and middle-upperish left were pulled up and flipped over. A resin topcoat is added.
If you Google ‘houston encaustic classes’ then Salli Babbit is one of the leading results.
Salli has monthly workshops which usually feature some aspect of encaustic method. I went for first time to her March 2014 workshop where the topic was ‘Shellac and fire’. Everybody had two panels to prepare with gesso and air dry, then create some sort of encaustic artwork.
After the piece was prepared, then we went outside, slathered on a coat of shellac, set it down on the sidewalk, then set it ablaze with a blowtorch. This results in an amber-colored crackle effect.
One guy had created a very nice scene of a church window – very detailed. But when it burned I watched in sort of mild shock as the detail dissolved and merged everything together.
My two pieces were pretty basic. There were about 15 people to share a couple hotplates of encaustic wax and brushes. So I just made a couple pieces of color stripes, went thick with the shellac and let both pieces burn out themselves.
Salli explained some options: a) don’t put shellac over the whole piece; b) blow it out before the burn completes; c) thick versus thin applications of shellac; d) clear versus amber shellac.
I had to leave these at the workshop as they were too wet and sticky to take home with me on the train. And even after a couple of days they were still tacky. So extra drying time is a factor.
Inkjet printing on transparency film is the subject of these two pieces.
Springtime in Houston yields an abundance of floral beauty. I snapped a photo of a neighborhood redbud with my smartphone and cropped out all the power lines and sky with photoshop, then printed it on transparency film, wanting to see how well the transparency film became invisible encased in encaustic, showing the full view of the underlying encaustic-painted sky. Could I avoid tedious scissor work?
I paired it with an image transfer of text snagged off Wikipedia.
To me the color printing on the transparency lost a lot of its vibrancy. And I should not have chopped off the image so obviously.
And I learned that once you have a finger print or smudge on the transparency, just throw it away. Windex destroys it. Best to use latex gloves.
Next came a photo from some of the snapdragons blooming in my front yard. I attempted a green screen — well cheap red plastic table covering actually, supported by tomato cage wire — to help with the photo masking in photoshop.
It came out much better, and went on to get the full resin topcoat treatment.
I subsequently ordered a green screen fabric off Amazon.


![IMG_20140307_131947944[1]](https://i0.wp.com/joelandersonart.com/wp-content/uploads/2014/04/IMG_20140307_1319479441.jpg)

